I’m so excited! I just have to share…even though chances are slim that you will have any need for a setup like this. Before I get started, let me first explain my situation and why I’m excited.
I have large loudspeakers in a small room, so to get the bass under control, my system really needed some help from a digital room correction system. After much research, I chose Acourate from AudioVero to design a target response curve and build FIR filters. See my previous blog post for details. The final step was to configure the convolution engine within JRiver Media Center to apply these filters during playback.
This system sounds great (to me, at least), and the JRemote tablet interface works really well. However, there are a few issues with this setup:
- Real-time convolution means playback controls have a few seconds of extra lag
- Playback is limited to PCM files (no DSD)
- No TIDAL HiFi Streaming
The first two are no big deal; I generally listen to entire albums or playlists, so lag is a non-issue once the music starts. I also only have a tiny handful of DSD tracks which, if I cared, could be converted to high-rez PCM files. However, that last issue–no TIDAL streaming–has been a major bummer! When someone suggests new music, I can login to TIDAL and preview it on my laptop but hearing what it really sounds like in the Loft must wait until I buy the CD or download it from HDtracks. When a friend drops by for a listening session without a thumb drive containing their favorite reference tracks, they are stuck wandering aimlessly through my collection. Not cool.
Until now, my only hope has been for a TIDAL player like roon to add a convolution feature or for JRiver to add support for TIDAL streaming. Sadly, neither of these things are likely to happen anytime soon. Other alternatives like feeding JRiver’s WDM or ASIO driver from a local TIDAL streamer proved unreliable at best. I’ve spent more hours than I care to admit trying to get TIDAL lossless streaming and digital room correction working together in the Loft.
My breakthrough came this evening when I started thinking about Signalyst’s Network Audio Adapter architecture:
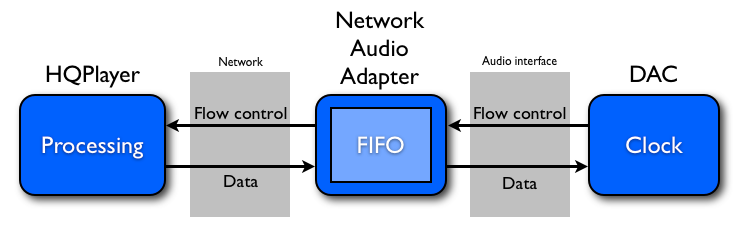
Ignoring room correction convolution for a moment, JRiver acts like the “FIFO”, streaming digital music data from my Synology NAS to my DAC, so the question was, “Is there a way to stream TIDAL to JRiver?” Thankfully, the answer was yes! JRiver can be configured as a DLNA Renderer. This is just a fancy “DLNA” way of saying that JRiver can be streamed to and controlled by an external media player. All I had to do was find a TIDAL player that could act as a DLNA server/controller and I’d be set.
The answer was an Android smartphone/tablet app called BubbleUPnP UPnP/DLNA. I had avoided DLNA in the past since I imagined that using it would somehow compromise sound quality; however, once I got things configured correctly, I have yet to notice any loss in quality.
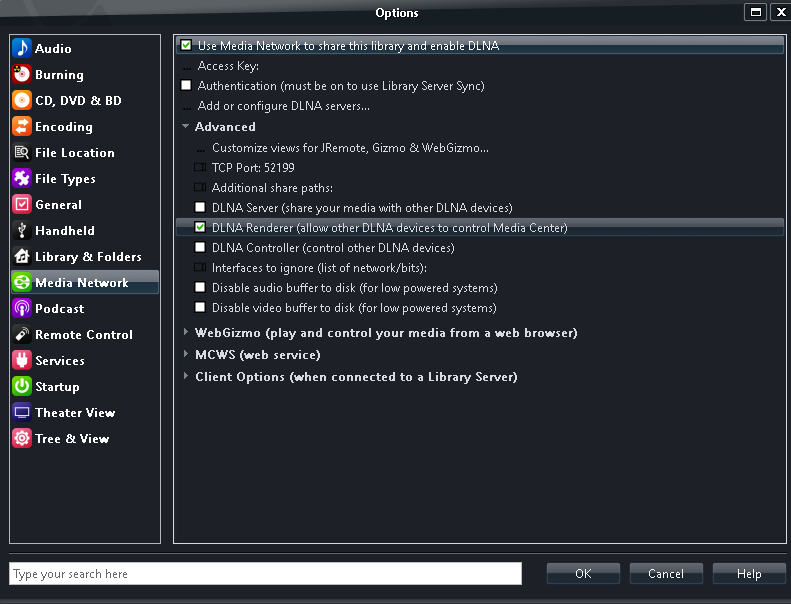
The first step was configuring JRiver to act as a DLNA renderer. If you have enabled the “Media Network” feature of JRiver (necessary for JRemote control), chances are that the DLNA renderer is already enabled, but confirm by opening settings and looking here:

Next, locate BubbleUPnP in the Google Play Store and install it on a compatible Android tablet or smartphone. Although the free version has worked for my testing, I’ll almost certainly spring for the $4.69 version to remove ads and playlist limitations.
Configuration of BubbleUPnP is just three steps:
- Select the Renderer (in our case, JRiver)
- Select the Library (TIDAL)
- Configure TIDAL for lossless streaming
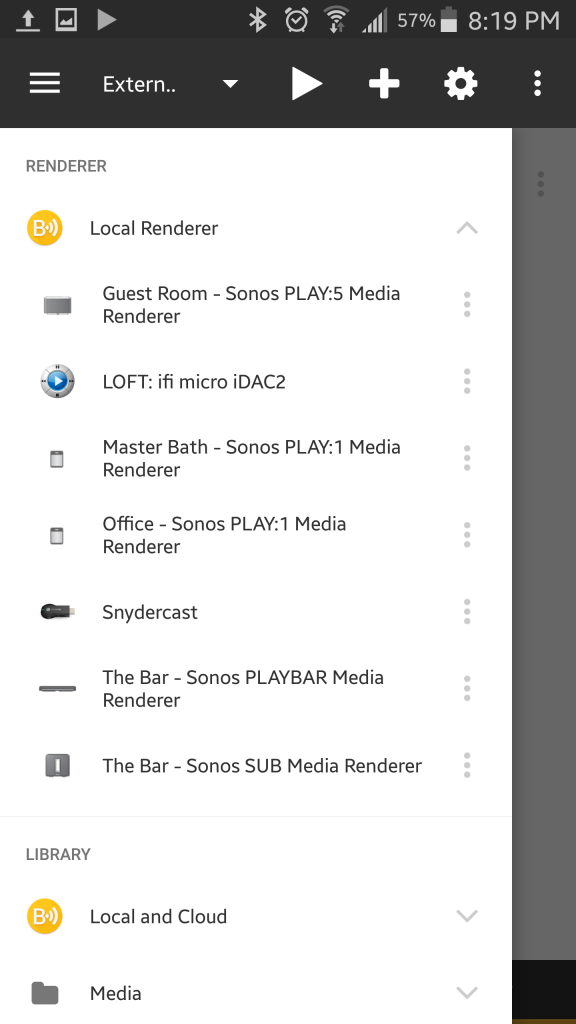
In my case, selecting the Renderer looked like this (I chose “LOFT: ifi micro iDAC2” with the JRiver icon):
BubbleUPnP can optionally display the properties of the renderer, including supported formats:
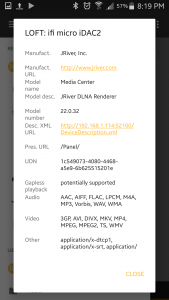
Note that while FLAC is listed, there’s no DSD…and even if there was, the convolution engine does not support it.
You’ll find TIDAL under “Cloud” in the “Library” setup section. The first time through, you’ll be asked for your TIDAL username and password:
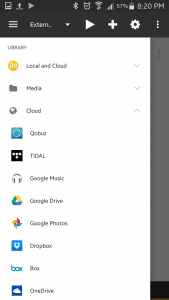
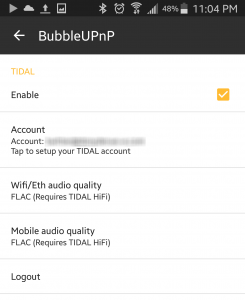
Before you play anything, you’ll want to make sure that TIDAL is configured to deliver the highest quality stream. By default, it’s 96kbps lossy compression…not good. To fix this, go to:
“Settings” -> “Settings” -> “Local and Cloud” -> “cloud content” -> “TIDAL”
…and make sure that “FLAC” is selected for both “Wifi/Eth audio quality” and “Mobile audio quality”.
Now you’re ready to go back to “Library” -> “Cloud” -> “TIDAL” and find some music. The TIDAL interface inside of BubbleUPnP is neither beautiful or sophisticated, but what functionality is there works well. Use the big magnifying glass at the top of the interface to search for some music. Depending on what you enter, you’ll get back a few folders on the screen that represent albums, artists, and tracks that matched what you entered. If it was an artist, pick the “Artists” folder…where hopefully, you’ll find the artist you were looking for near the top of the list. After making your selection, you’ll find more folders representing albums, top tracks, radio, etc. I usually head straight to “Albums” and then queue up what I’m looing for from there. For example:

A few seconds after initiating playback from BubbleUPnP, you should see/hear playback starting on JRiver. You can even verify this using JRemote, which shows the album art and some of the track metadata:
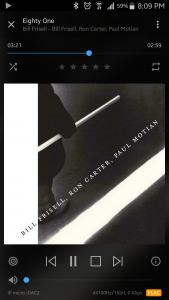
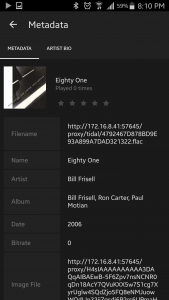
The thing to look for here is the “FLAC” indicator at the bottom of the screen. This is confirmation that JRiver’s DLNA Renderer is getting a lossless stream from TIDAL by way of BubbleUPnP. The “Info” button on JRemote provides more interesting details. For example:
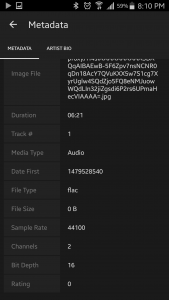
Note that you can optionally use JRemote to pause/stop playback and skip forward/back within the track that’s currently playing. However, JRiver will only “see” one track at a time in the playlist. Also, I found that I can’t resume playback from within JRemote after I stop it; I have to go back to BubbleUPnP to resume. I can do that from either the “Playlist” or “Now Playing” views in BubbleUPnP.
I have not spent much time doing direct comparisons between local FLAC and FLAC streams of the same albums from TIDAL, but this setup really sounds great. I seriously doubt that I could tell them apart when TIDAL has the same master and release. This setup has worked flawlessly with the convolution engine within JRiver that I depend on for room correction, and although the TIDAL interface is a little clunky, once an album is queued up, I forget all about that and just enjoy the music!
This has been a major breakthrough for me since it enables lossless TIDAL streaming while applying Acourate room correction filters in our main listening room. If this had not worked, I was heading down the path of buying a microRendu, roon, and HQPlayer plus a more powerful desktop PC to run the processing…or perhaps considering the Aurender route…a few thousand bucks either way. Now it seems that I don’t have to. 🙂
Even if your use case is less complex, I hope you find some way to take advantage of a setup like this. Cheers and happy listening!
Update: If you don’t have an Android smartphone or tablet handy, it may be possible to do the same thing that I have described above on Apple IOS devices using mconnect player. If I get around to testing this, I’ll post any setup gotchas here.
Another interesting use case for this JRiver DLNA Renderer setup is enabling guests to stream music from their mobile devices to your playback system without having to resort to Bluetooth. All they would have to do is install the free version of BubbleUPnP or mconnect player.
2nd Update: I’ve expanded a bit more on the ideas behind this setup on the Morrow Cables Forum. Here’s a link: Can Streaming Sound Better than CD?
3rd Update: Gapless playback with BubbleUPnP + JRiver! Yes, that’s right. Just enable “Enable gapless control” under the “UPnP Tweaks” menu in BubbleUPnP Settings:
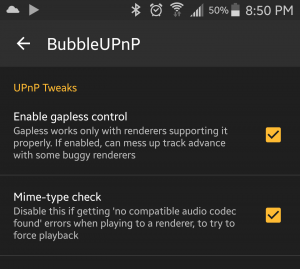
In spite of the warning, this setting works beautifully in JRiver. With this setting enabled, I can enjoy an album from start to finish with no gaps between tracks. It’s a beautiful thing!